Set clear expectations and goals for employees and use game concepts to stimulate performance. Make feedback normal, pervasive, continuous. Recognise achievements both great and small. Get expert consultation now.
Set clear expectations and goals for employees and use game concepts to stimulate performance. Make feedback normal, pervasive, continuous. Recognise achievements both great and small. Get expert consultation now.
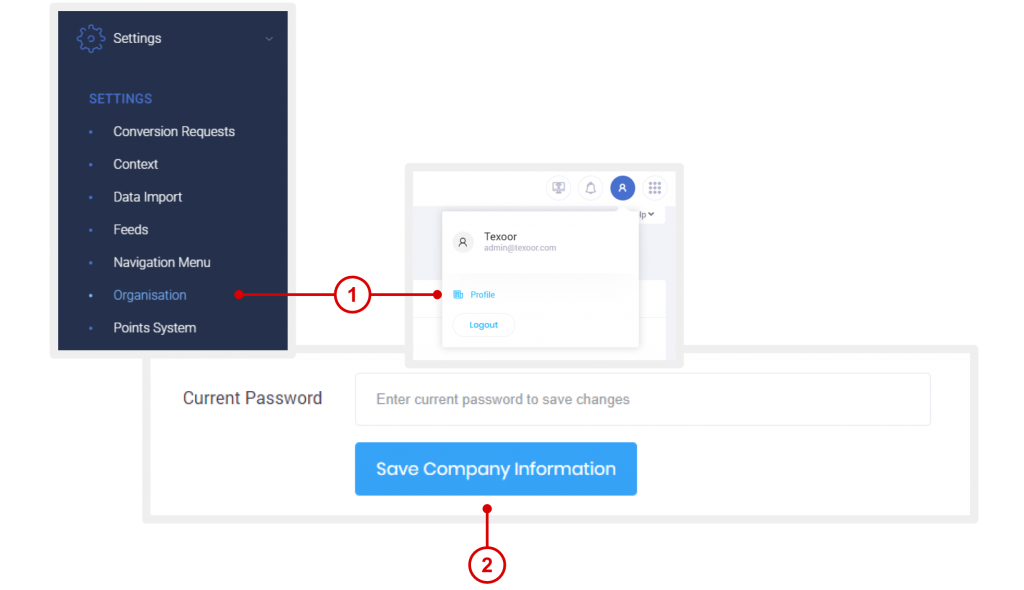
On the profile icon on the top right, click Profile or on the left navigation menu, click Settings > Organisation.
After making the necessary changes, enter your current password, and click Save.
When notifications and targeted emails are sent from the program, the NAME and EMAIL ADDRESS specified here will appear as the sender's name and email address in their inbox.
Program Information
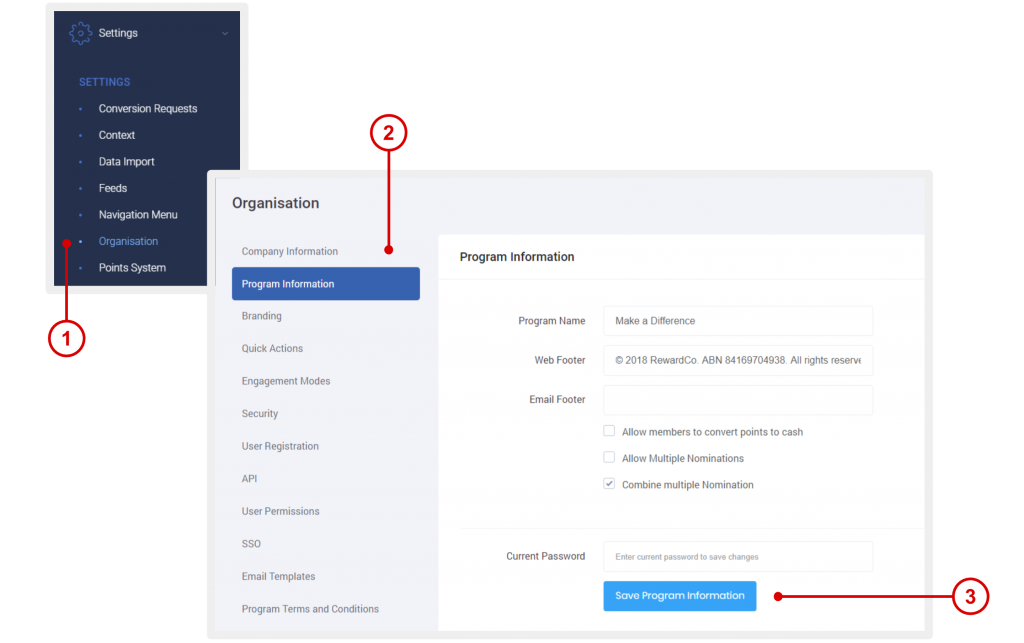
On the profile icon on the top right, click Profile or on the left navigation menu, click Settings > Organisation.
Click the Program Information tab.
After making the necessary changes, enter your current password, and click Save.
Your PROGRAM NAME appears on the login screen as well as on page meta title.
Branding
On the profile icon on the top right, click Profile or on the left navigation menu, click Settings > Organisation.
Click the Branding tab.
Web App Logo: This logo is displayed inside the application, for logged in users.
Login Logo: This logo is displayed outside the application, for users not logged in. For example, login screen, registration page, terms, and conditions page.
Branding Image: Image displayed on the left side of the home page or login screen.
Program Description: Text displayed above the branding image on the left side of the home page or login screen.
Login Background: Background color displayed on the left side of the home page or login screen.
Program Description Color: Color of the text displayed above the branding image on the left side of the home page or login screen.
Program Name Color: Text displayed just below the logo on the home page or login screen.
Login Button Text Color: Text color on the login button.
Login Button Color: Color of the login button.
Login Button Hover Color: Color displayed when users hover the login button.
Delivery Information Text: This text is displayed to members when they are redeeming products or gift items.
Change Theme
For customizing colors inside the application.
On the profile icon on the top right, click Profile or on the left navigation menu, click Settings > Organisation.
Click the Change Theme tab.
After making the necessary changes, enter your current password, and click Save.
Email Templates
Manage email notifications that go out to you as an admin and to your members.
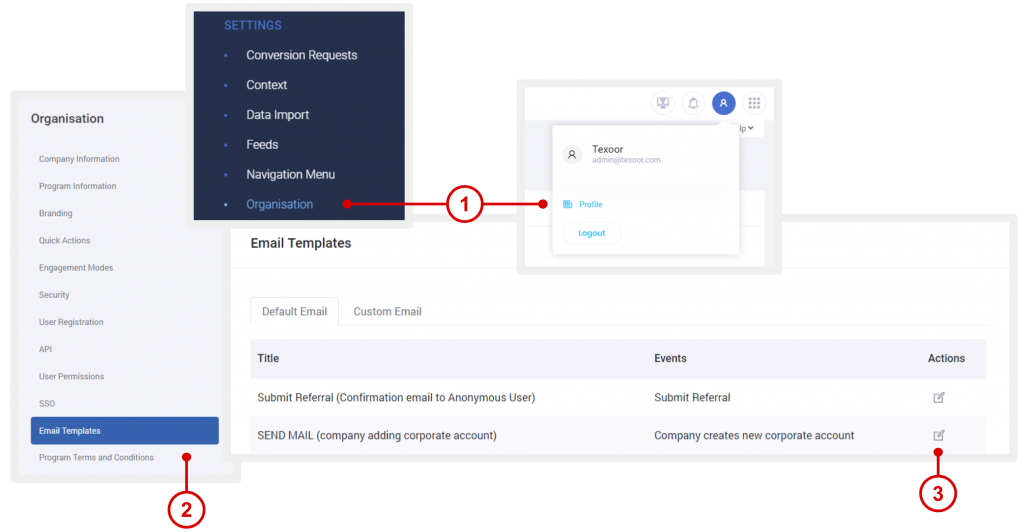
On the profile icon on the top right, click Profile or on the left navigation menu, click Settings > Organisation.
Click the Email Template tab. Here you'll find a list of preconfigured email notifications.
Locate a template you wish to edit, and click the EDIT icon under "Actions".
Once done editing the template, enter your current password, and click SAVE to complete the update.
Registration
Allow users to join the program through self-registration, or auto/manually approve their request to join.
On the profile icon on the top right, click Profile or on the left navigation menu, click Settings > Organisation.
Click the Registration tab.
After making the necessary changes, enter your current password, and click Save.
Data Import
Import users into the program.
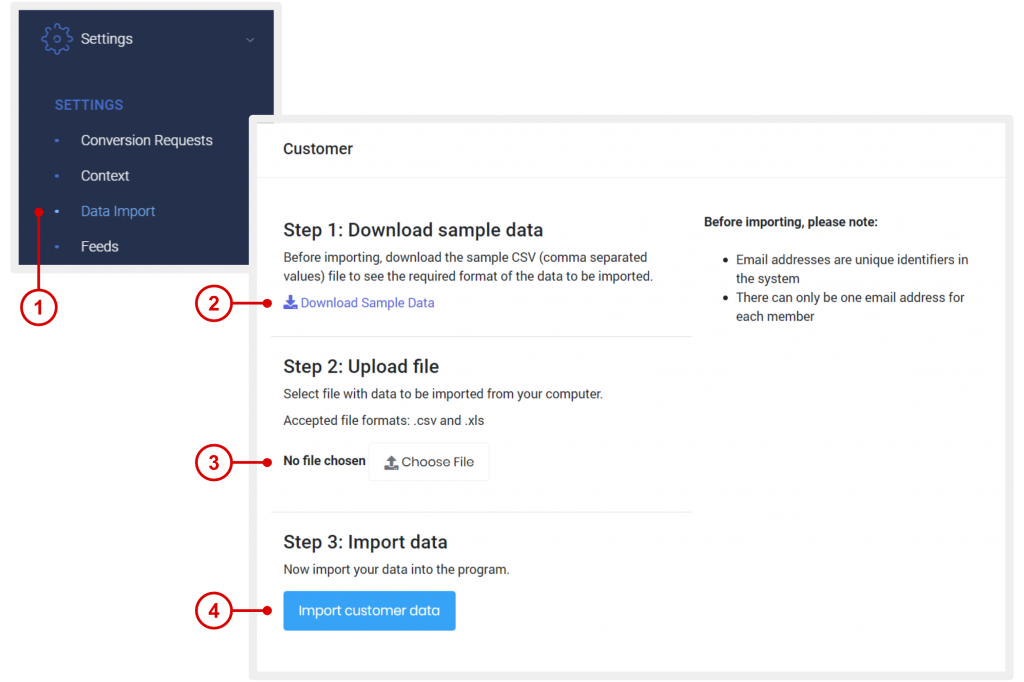
On the left navigation menu, click Settings > Data Import.
Please read the instructions for importing, and click Download Sample Data to see the required format of the data to be imported.
Once you're ready to import, click Choose File to select the file from your computer.
Click Import.
We recommend that you wait while the system imports your users. If you run multiple member type programs, you can specify what type of users you wish to import by clicking on the specific user tab. To add users manually one at a time, see “Add Users Manually”. If there are any errors with the import, you will be shown a report of the errors after the import is completed.
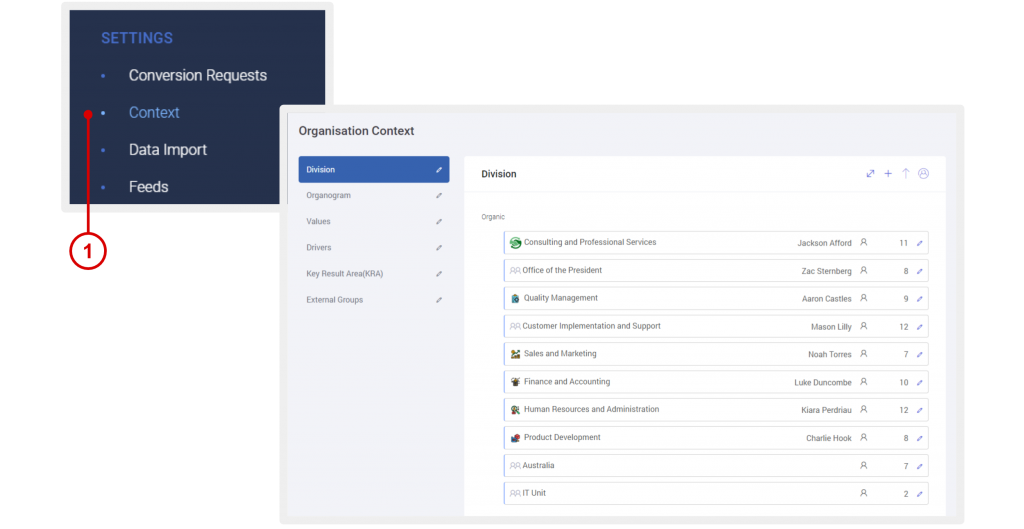
Organisation Context
Setting up your organisation context early in the program allows for easy tracking, monitoring, and measuring.
On the left navigation menu, click Settings > Context.
The terms or titles presented here can be edited to fit your organisation.
For example, "Values" could be Corporate Values, Enterprise Behaviours or terminology used in your organisation to describe key values.
Once you're done with the terms or titles, you can start building up the context.
To add value, click the ADD icon.
To import a list of values, click the IMPORT icon.
Context Description
Unit: For segregating your pool employees or partners into groups. Specific programs, campaigns or offers can be made available based on units or groups.
Organogram: Organisational structure of hierarchy presented in the program.
Values: Company or organisational values.
Drivers: Business drivers.
KRA: Company key result areas.
External Groups: For segregating your pool of member user-types. Specific programs, campaigns or offers can be made available based on units or groups.
 EMPLOYEE ENGAGEMENT
 CUSTOMER ENGAGEMENT
 MEMBERSHIP ENGAGEMENT
 PARTNER ENGAGEMENT